
I
adore good headshots. Nothing can replace a good, professional headshot, taken by a professional photographer. Let me show you one: This is John Rubin, an associate with von Briesen & Roper in Waukesha.
What’s great? The answer is: Where do you look first? I’ll wager that your gaze went straight to John’s eyes. And what you find there – and in his slight smile – is an expression that, for me anyway, makes me want to take him to lunch just for the conversation. In addition, the lighting is excellent for him, and the background doesn’t distract from his face.
We all know headshots are important – they are typically a potential client’s first look at you. They are, literally, your online image. But getting a good one can be a hassle (and cost money).
John’s photo was taken by Paul Hanon, a Milwaukee-area photographer who specializes in headshots. Take a look at Hanon’s work at
premierheadshots.net to see what makes his shots great.
Although I’m the staff photographer, the State Bar of Wisconsin sometimes employs other photographers for lawyer portraits and headshots when an occasion calls for it (such as for the cover of this magazine’s November 2021 “Innovation” issue). Want a free, professional headshot? Run for the State Bar Board of Governors; Madison photographer Andy Manis (manisphoto.com) attends the board’s first meeting of the fiscal year in September for a group shot of the board (available at
wisbar.org/aboutUs/Leadership/Pages/Leadership.aspx). Manis also does individual headshots, and his portrait of Michelle Behnke graces the cover of this magazine’s
September 2021 issue.
Of course, Behnke’s photo is a portrait. In this column, I’m talking about headshots – the face-and-shoulders photo that appears on your WisBar profile and in your bio when you write for a State Bar publication.
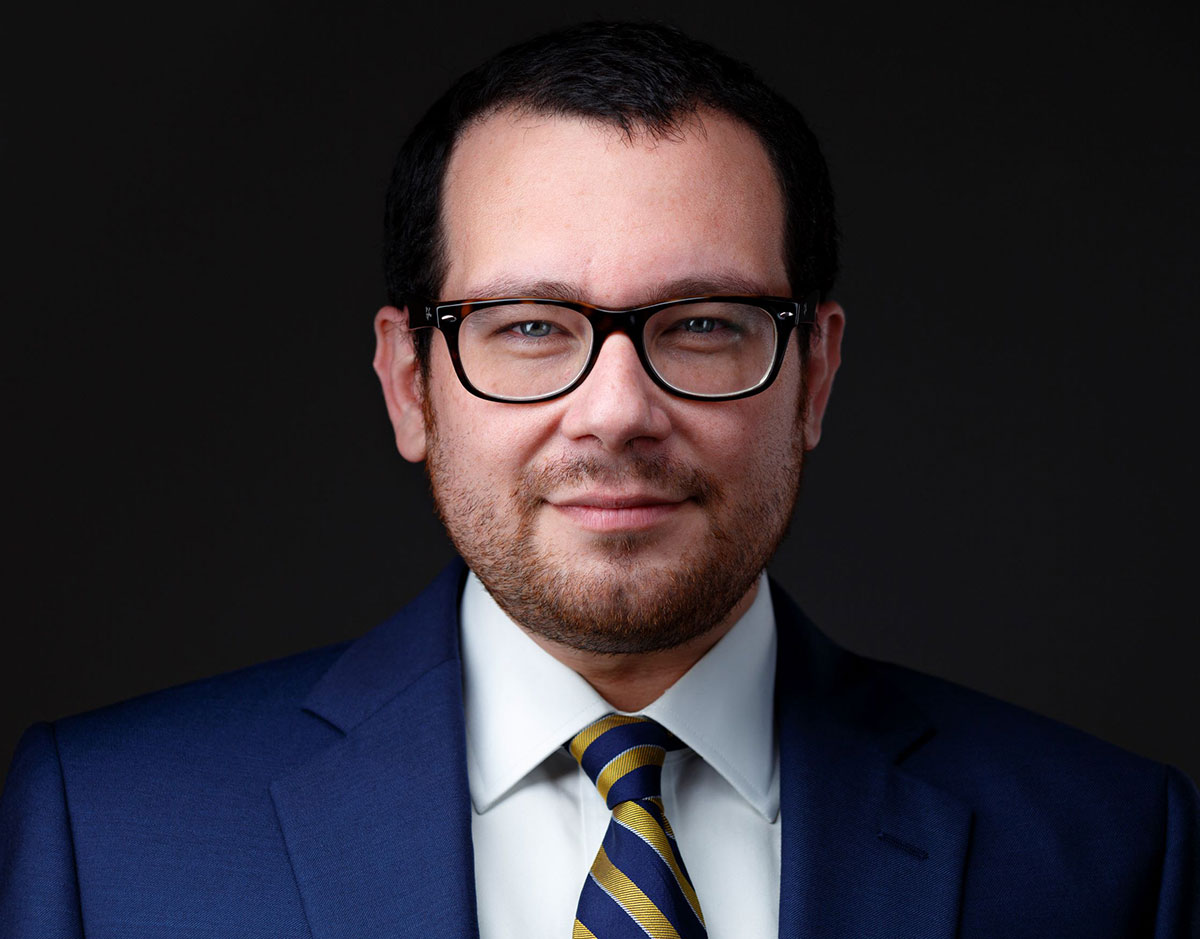
Headshot of
John Rubin, an associate with von Briesen & Roper in Waukesha, taken by headshot photographer Paul Hanon (used with permission). This was taken in a photo studio with professional equipment.
I Want a Good Headshot, but Can’t Afford a Photographer
Not everyone has the resources to hire a professional photographer. Or perhaps you don’t have time to get one taken before a submission deadline. What then? Turn to your smartphone.
You might not get a great headshot like John’s, but you can learn to take one that is “decent.” One that shows you in a good light.
How do you do this on your own? Gather some equipment, practice in a mirror, plan your outfit, choose a good setting, then experiment. Let’s start with the equipment.
Equipment: A Smartphone, a White Piece of Paper, a Sturdy Chair, and a Friend
If you have a smartphone, you have a camera that’s up to the task. In fact, I vividly remember when, in my previous job as a newspaper reporter, a smartphone camera became good enough to take photos worthy of our front page – and that was some time ago. So, I’m going to wager that you already have the camera you need.
Is your smartphone good enough? The examples in this article were taken with the front-facing camera on my two-year-old iPhone 11, which has the same specs as the latest iPhone 13. If you have a phone that isn’t terribly old, yours should be fine. (In the market for a smartphone? See “Pick Your Winner: 2022 Smartphone Lineup” for a comparison of the best currently available choices in the January 2022
Wisconsin Lawyer.)
Also: A white piece of paper or small lamp, a chair or stepladder, and a friend. More on these later.
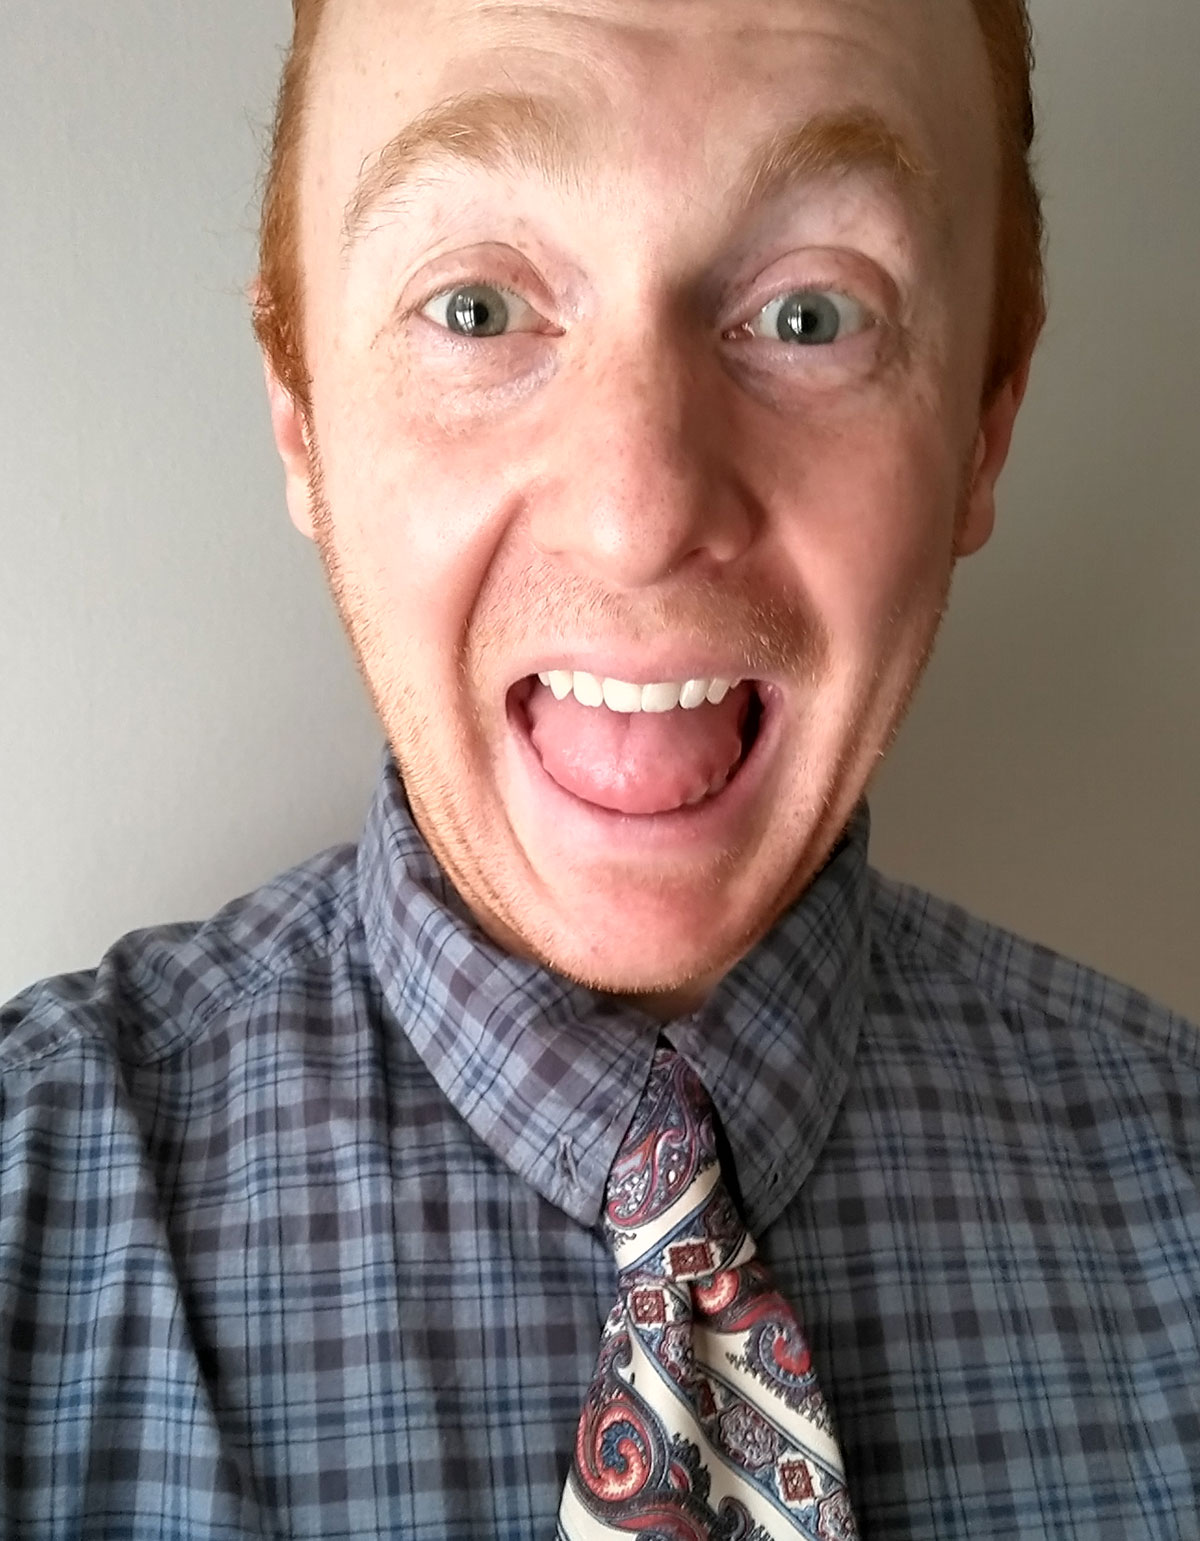
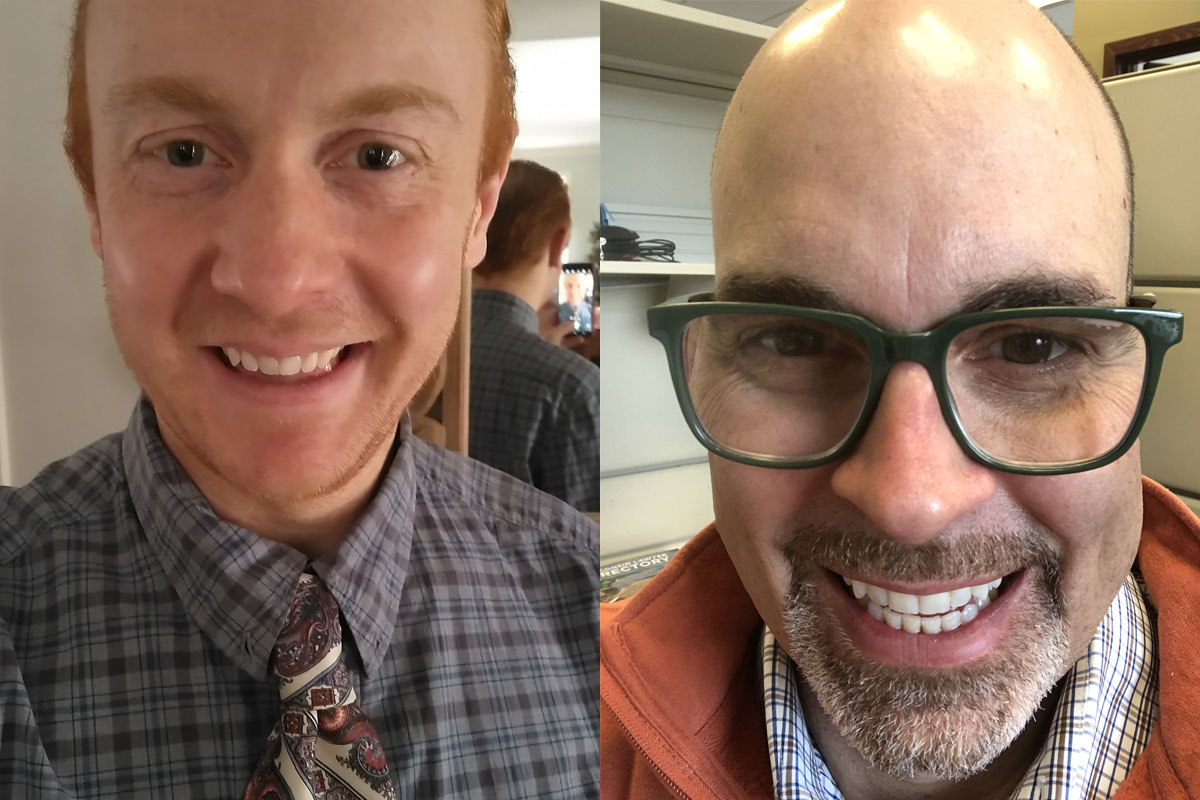
A good headshot needs all these elements: a non-distracting background, good lighting, a good expression, room for cropping, and non-distracting clothing.
Peter Kraemer, State Bar digital communications coordinator, deliberately fails at four of them here. (Photo by Kraemer, taken with a Moto G Power (2020) with Android 11.)
Prepare for Your Photo: Clothing, Hair, Expression
To take a decent headshot, you must prepare. Pay attention to these tips.
Clothing. Wear “court clothes” even if you never set foot in a courtroom in your job as a lawyer. Avoid any pattern or color that will distract from your face, or clashes with your background, and aim for conservative jewelry (if any). And shirt wrinkles? Oh, dear, no.
Hair. Your hair should be freshly styled and not distracting. The focus is your face – and specifically, your eyes: we should see them clearly.
Expression. A great expression is difficult to improvise when a camera is in your face, so practice ahead of time. You don’t need a flashy smile (look at John Rubin’s and Jacque Evans’ expressions in the example photos). Practice in front of your bathroom mirror. Try for confident, relaxed, and warm. Teeth or no teeth? That’s up to you, but don’t let your smile look like a grimace – your face needs to be relaxed. For inspiration, use that expression you give a grandparent when they tell you they are proud of you or the one you give a beloved child when they groan at your “dad joke” (but no eye rolling).
Eyes. A photo is 80 percent about your eyes. Look directly into the camera, and practice your eye expression in a way that looks and exudes lawyer confidence.
Prepare: Get to Know Your Smartphone Camera
Review how to take a photo with your smartphone, and practice.
Check out the different camera modes. Use the timer. Turn the flash off, and force the flash to fire.
Check where the photo is saved, and how to get it off your camera (we advise using email).
Does your smartphone have a portrait mode? On the iPhone, you can use this mode to later adjust depth (the f-stop or aperture), producing bokeh or background blur, which helps the subject stand out better.
iPhone users: By default, iPhones take photos in HEIC format (which saves space). We found that emailing iPhone photos converted them nicely to JPG format (what we need here at the State Bar).
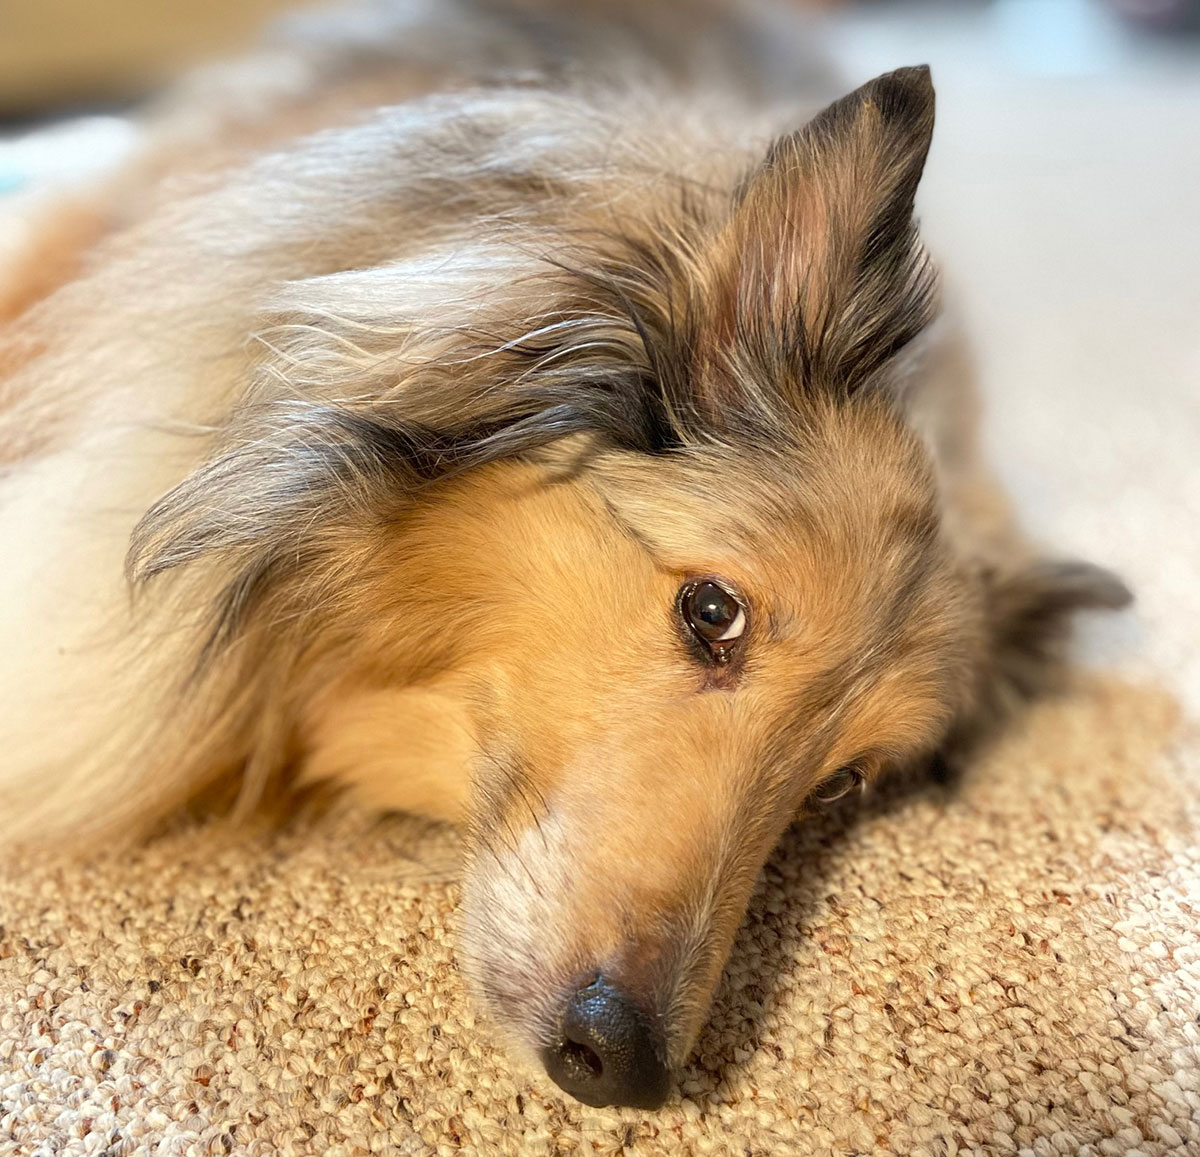
This is an iPhone 11 photo of my Sheltie, Tesla, using the portrait mode. See the blur behind his shoulders? That’s bokeh, which you can increase or decrease after taking a portrait-mode shot. (Isn’t he adorable?!)
The Photo Session: Angle, Setting, Location, Lighting
Before you begin, give yourself enough time to set up and experiment. I suggest you block off at least a half hour for this.
 Shannon Green is communications writer and staff photographer at the State Bar of Wisconsin, Madison. She holds a bachelor’s degree in writing from St. Olaf College, Northfield, Minn. She is a former reporter for the
Monroe Times and the
Portage Daily Register, both in Wisconsin, where she learned portrait photography on the job. She can be reached by
email or by phone at (608) 250-6135.
Get to know the author: Check out Q&A below.
Shannon Green is communications writer and staff photographer at the State Bar of Wisconsin, Madison. She holds a bachelor’s degree in writing from St. Olaf College, Northfield, Minn. She is a former reporter for the
Monroe Times and the
Portage Daily Register, both in Wisconsin, where she learned portrait photography on the job. She can be reached by
email or by phone at (608) 250-6135.
Get to know the author: Check out Q&A below.
Location and Lighting Considerations. Determining the proper setting and lighting is the most difficult part. You will need good lighting – and by this, I mean even, nondramatic, “soft” lighting. If you have dark hair, use a lighter background so your hair doesn’t fade into the background.
Where do you go? Your goal here is for gentle, even lighting and a boring background (and absolutely avoid the clichéd filled bookshelves, please). Make what’s behind you (the background) uninteresting and plain – because
you should be what’s most interesting in the photo.
Outdoors. Stand in shadow, not in full sun or dappled or partial shade. Make what’s behind you uninteresting or with lots of bokeh (background blur). See the example photo of Joe Forward.
Avoid using your camera’s flash – the lighting is too harsh (that is, it make brights brighter and darks very dark). If you must be in direct sun or have a bright background, put it to your back and use your flash to light your face.
Indoors. Choose an uninteresting or blank wall where you are near a window, which should ideally be either in front of you or to the side –
never behind you.
Do you have circular can lights in your ceiling? Move away from them. In fact, move to a different location entirely. They spotlight the top of your head and shoulders, not your face.
Too many shadows on your face? This is where you need a window, or a friend with a piece of paper or a lamp. If the shadow side of your face is too dark, use a white paper (held nearby) or a small lamp (held tangentially).

This is a professional photo of our Communications Director,
Joe Forward, taken in August 2021 by photographer Andy Manis. Manis used additional lighting, and it was taken outside the Bar Center. Note the background blur, even lighting, an expression that works for Joe, the angle of his shoulders to the camera, and that the camera was above Joe’s eyes. Bonus: Manis left plenty of cropping room.
Two Hard Rules: No Filters, No Selfies
First: No filters. They are okay for Snapchat, but not headshots. Second: No selfies. There just isn’t enough distance to provide your best angle. That is, you need to build space around you to allow for cropping. Instead, have a friend take your photo (see Jacque Evans’ photo) or use the timer on your smartphone camera to get a proper distance (my iPhone 11 gives me as many as 10 seconds).
Just Before the Shutter-click*
*Yes, it’s all digital and no actual shutter moves. But the camera shutter-click sounds are spot on! Here are some last minute tips:
Where to stand. Stand at least 1-2 steps in front of your background so there’s no shadow on the wall behind you.
Hair. Double check. If you have long hair, it’s best to split it evenly on both sides of your head and bring it forward over each shoulder. If you have fly-away hair, put a
very small amount of hand cream in your palms, then pat your hair gently to flatten those fly-aways.
Shiny head. If you have a shiny head or skin, avoid overhead lights.
Expression. You don’t have to show teeth, but your expression should show your confidence and approachability (you practiced this in a mirror, right?).
Camera angle. Check your angle to the camera: Do you look best straight on or at an angle?
Camera position. Most people look best if the camera is slightly above them (this is where the sturdy chair or a stepladder comes in for the person taking the photo). See the example photos at the conclusion.
Leave crop space. Take the photo with plenty of room at top, bottom, and both sides – this allows a variety of crop sizes.
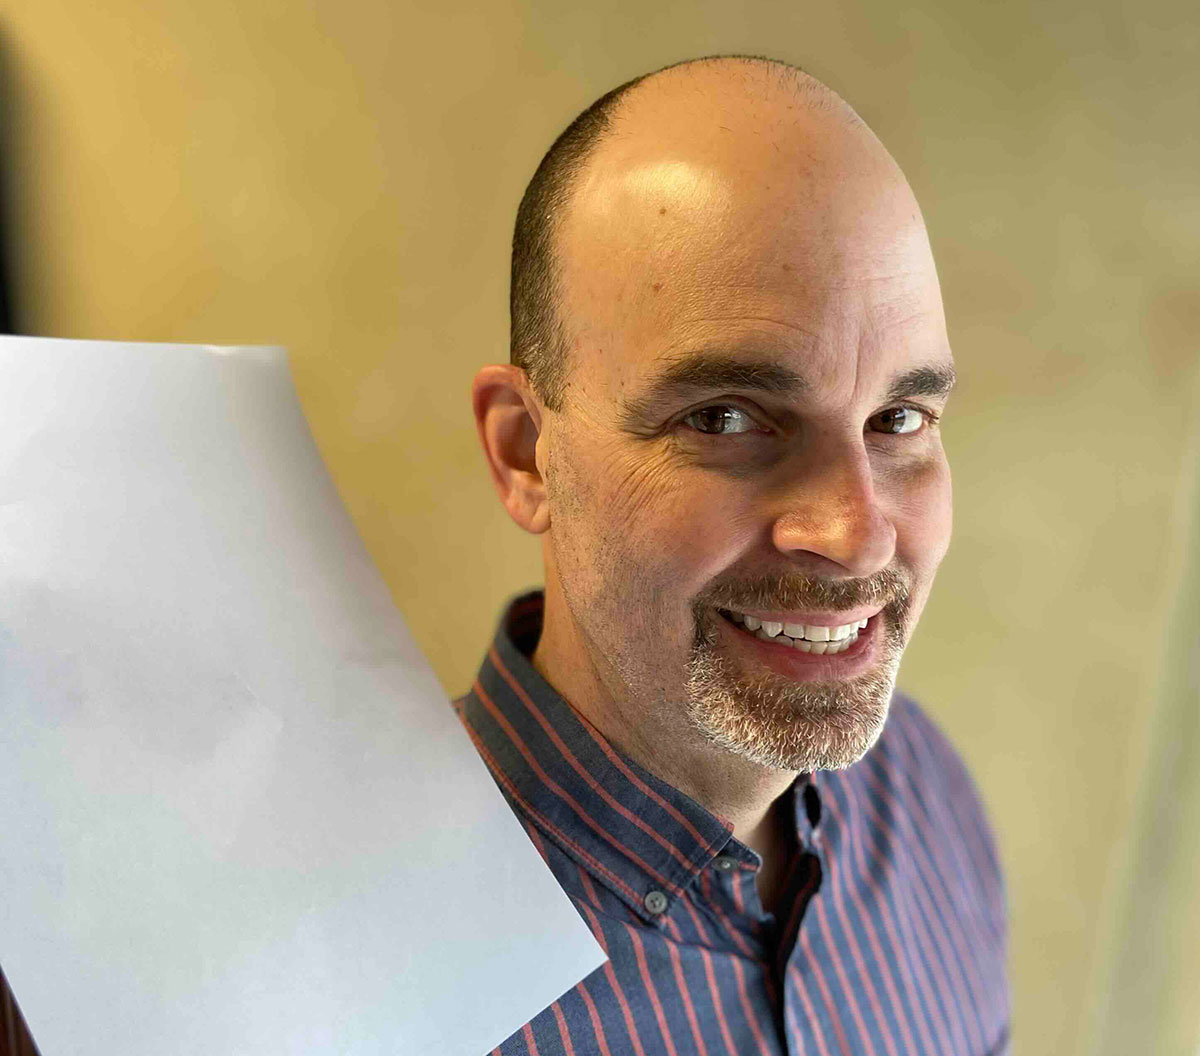
You can “fill” shadows with gentle light by using a piece of white paper or a small lamp on the side of the face that’s too dark. Play with the angle so that you don’t have odd shadows on your face. Here’s
Jeff M. Brown, our legal writer. This was taken with my iPhone 11 using a window for lighting.
Take a First Shot and Check
Experiment liberally – you can always delete the files that don’t work – it’s not like you’re using up film. (Remember the days of dark rooms and one-hour photo processing? Our legal writer, Jeff M. Brown, is experimenting with film photography. It is a completely different art form than digital photography!)
Lighting. Is it working for you?
Eyes. Should not be in shadow or blocked by hair. Are they in focus?
Expression. Does it show your confidence and approachability? Experiment: Lean in toward the camera, and catch it with your eyes. Put some light on the background behind you – especially if you have dark hair. Take horizontal and vertical shots (landscape and portrait).
Angle. Is this the best one for you? Move and change how you face the camera. Try direct on and at an angle. Take photos from the level of your eyes and above (below rarely works). Tilt your head a little to one side or the other. Which angle looks best?
Keep room for cropping around you. That means building in space at the top, bottom, and both sides of the photo. This is important. See the example of Joe Forward’s photo by Andy Manis.
Add light or take it away – get creative. If you’re inside, try moving closer to or farther away from your light source (usually a window). To fill in shadows on your face, have a friend hold a small lamp or a white sheet of paper toward your face’s darker side.
A selfie is great fun, but too casual for your headshot.
Peter Kraemer’s selfie (left) is taken with his Moto G Power;
Jeff Brown’s (right), is taken with his iPhone 8. Notice that there isn’t room for cropping – the frame is too close to their faces.
Our Results: A Few More Examples
Since Jeff M. Brown kindly offered to model for headshots, see the three on the next page. We took them on two cloudy winter days at the State Bar Center. Here’s what I do and don’t like about them.
Expression and background. All show a relaxed, easy smile, which I think works best for Jeff. Two of them use a blank wall as a background. The middle one uses bookshelves, which we don’t prefer because, for lawyers, it is very cliché. A blank wall ensures the focus will be on you.
Clothing. Two show Jeff in a suit, and one in a casual shirt. Do you think he looks more approachable in the casual shirt? There’s also another trick in this photo: a view slightly from above, and also a
slight tilt on cropping that photo. The other two are at eye level – that makes them look quite different from the “casual” photo.
Lighting. In the left photo (suit plus blank wall), we placed Jeff immediately opposite a window, lessening the shadows on his eyes. In the other two photos, we had a window for lighting at his left – creating a too-dark shadow on his left eye. Lighting is the trickiest part! This is why a professional uses formal lighting for headshots.
The result. Taking time to experiment is key. Be patient with yourself. Sometimes the shot you like best is one that might not have been the best at first. My experience is that many photos are much improved after they are properly cropped (which we do here, using Photoshop).
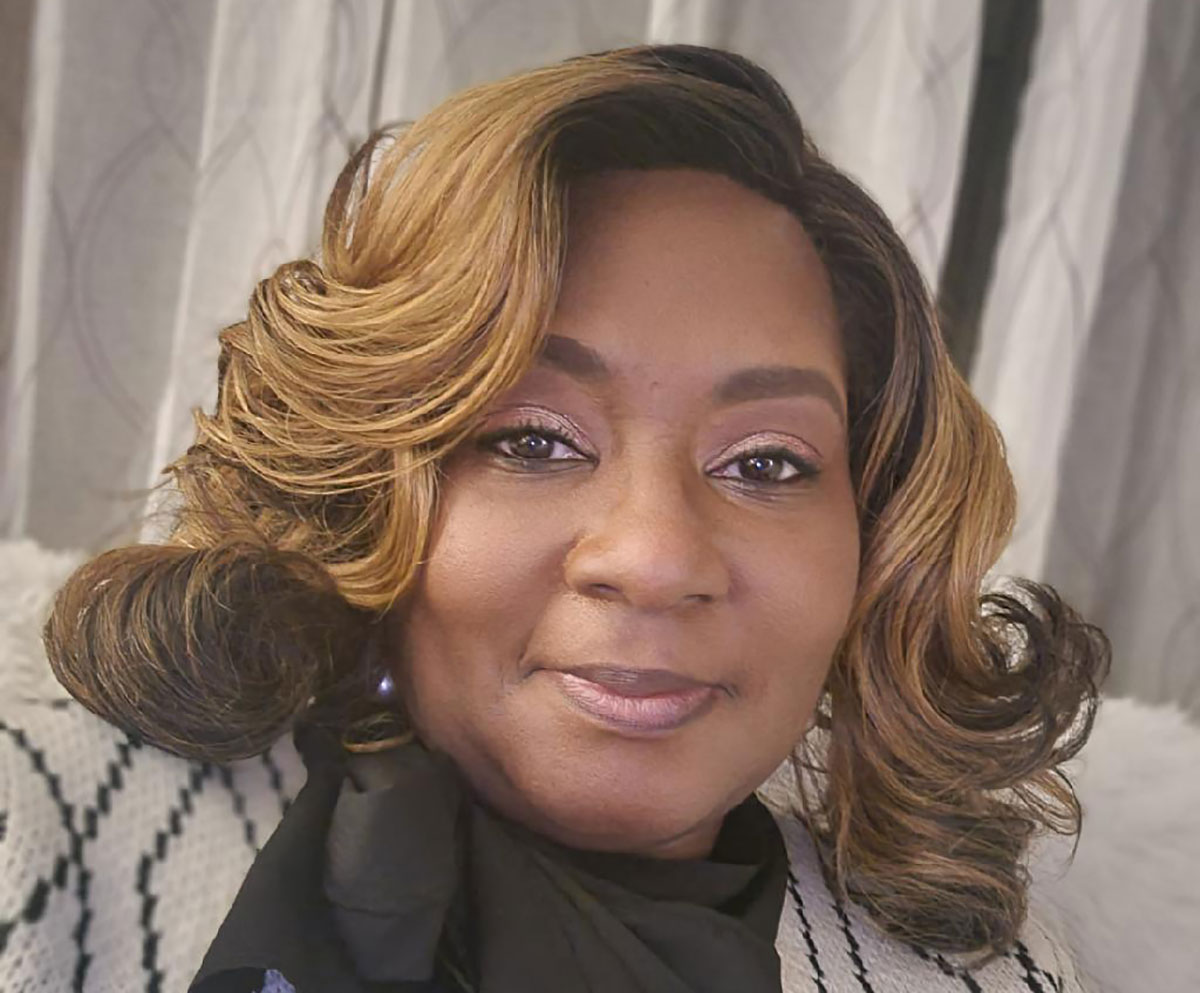
Meet
Jacque Evans, the State Bar’s diversity and inclusion specialist. This photo was taken by her daughter, with a Samsung Galaxy Note 20 Ultra. What’s good about this photo: She has a relaxed expression while looking into the camera, the background isn’t distracting, and the lighting is even. There is a little room here for cropping, although more would be ideal.
Using Your New Headshot
Email it to yourself from your smartphone – send it using the biggest size. Be sure to save it in a safe place and keep that original shot after you have cropped or sized it. And remember where you put it – after all, I may need to request “your biggest version” for your next
Wisconsin Lawyer article! Use your photo in your
WisBar profile, on your website, in your blogs, and across all your social media platforms.
One More Thought: How Often?
How often should you update your photo? Ideally, when your appearance has changed. As a rule, once every 3-5 years is good. Since you’ve just learned how to take a headshot yourself – why not do a new one more often? Change your hair color or style? Make a new headshot!
Conclusion
Experiment; have fun! But if you’re still unhappy with your photo, it is definitely worth hiring a professional – ask your colleagues for recommendations in your area.
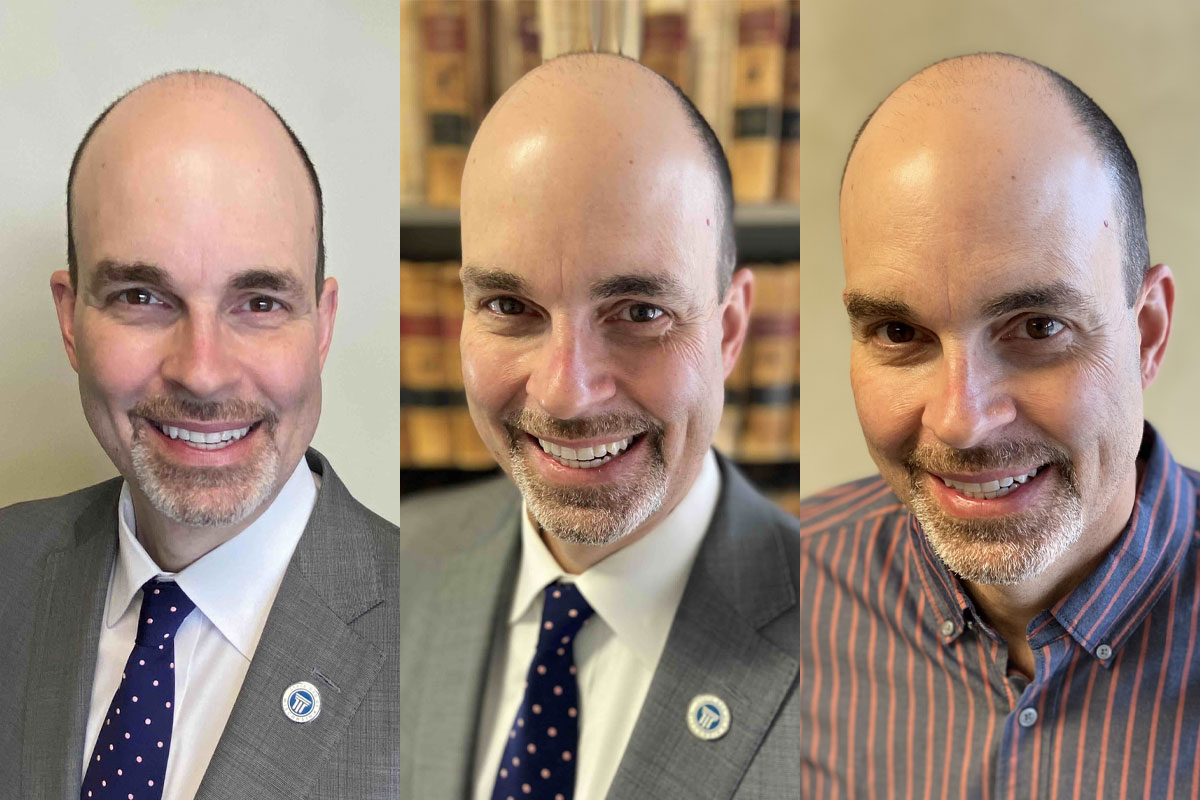
Results from our experimentation with
Jeff M. Brown as a model shows differences in background, clothing, angle, and lighting. Which do you like best? Does his expression work for him? All taken with my iPhone 11, using a window as lighting, and I used a stepladder for the photos with the plain background.
Meet Our Contributors
What is your most memorable trip?
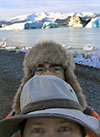 In late October and early November 2016, my husband and I visited Iceland, as photographers and to enjoy its natural beauty. We drove our rental SUV all over southern and western Iceland, from Snæfellsjökull National Park in the west to Jökulsárlón in the east, stopping at every waterfall we could find. The weather was cold, rainy, and very, very windy. We ended up needing all the layers of clothing – including waterproof pants bought at the last minute – that we brought with us, and I grew to love heated steering wheels. At one point, we could barely open the vehicle’s door due to the force of the wind and sleet!
On our 10-day trip, we got to see the northern lights just once (on an extremely cold night). We are pictured here at the famous Jökulsárlón, a large glacial lake in southern Iceland at the base of the Breiðamerkurjökull glacier, part of the Vatnajökull National Park. It is here that icebergs are born and find their way out of the lake and into the sea. These, along with its black-sand beach, make the area a (very, very cold) photographer’s wonderland. (Photo taken Nov. 1, 2016, with an iPhone 6.)
Shannon Green, Communications writer, State Bar of Wisconsin, Madison.
Become a contributor! Are you working on an interesting case? Have a practice tip to share? There are several ways to contribute to
Wisconsin Lawyer. To discuss a topic idea, contact Managing Editor Karlé Lester at (800) 444-9404, ext. 6127, or email
klester@wisbar.org. Check out our
writing and submission guidelines.
» Cite this article:
95 Wis. Law. 51-55 (February 2022).
